A professional and efficient way how to paint ceiling with sprayer. This method allows for a quick and even application of paint, saving both time and effort. By utilizing a sprayer, you can achieve a smooth and flawless finish on your ceiling, enhancing the overall appearance of the room. Painting with a sprayer also eliminates the need for traditional brushes and rollers, reducing the chance of streaks and brush marks. It is an effective technique that can be utilized by homeowners and professionals alike.
When painting a ceiling with a sprayer, it is essential to prepare the area by covering furniture, floors, and walls with drop cloths or plastic sheeting to protect them from overspray. Additionally, ensuring proper ventilation in the room is important to dissipate any fumes from the paint. Before starting, it is crucial to test the sprayer on a small area to adjust the paint flow and spray pattern to your desired settings. Once everything is set, begin by spraying the edges and corners of the ceiling, gradually systematically moving toward the center.
This technique ensures even coverage and prevents any missed spots. It is recommended to apply multiple thin coats rather than one thick coat to achieve the best results. Finally, allow the paint to dry completely before removing the protective coverings.
A noteworthy tip when using a sprayer to paint a ceiling is to maintain a consistent distance between the sprayer and the surface. This ensures an even application of paint and avoids any uneven patches or drips. Another important consideration is to choose the appropriate type of paint for your ceiling, taking into account factors such as the texture and condition of the surface. By following these guidelines and utilizing a sprayer, you can achieve a professional-looking finish that enhances the aesthetic appeal of your room.
According to the article “How to paint ceiling with sprayer”, using a sprayer is an efficient method for painting ceilings due to its ability to provide a quick and even application of paint.

Table of Contents
Key Takeaways:
- Preparing the work area is crucial before painting a ceiling with a sprayer. This includes covering floors and furniture with plastic drop cloths, taping plastic sheets to the walls, removing furniture for easier access, and ensuring proper ventilation.
- Properly prepping the ceiling is important to achieve a smooth finish. This involves sanding the ceiling for better paint adhesion and washing the ceiling to remove dirt and dust.
- Setting up the sprayer correctly is essential for successful ceiling painting. This includes straining the paint for smooth spraying, priming the sprayer, and adjusting the sprayer settings for painting
Preparing the Work Area
Preparing the work area is crucial before starting to paint the ceiling with a sprayer. In this section, we will discuss the essential steps involved in getting the work area ready. From covering floors and furniture with plastic drop cloths to ensuring proper ventilation, we’ll provide valuable tips to create a clean and safe environment for a successful ceiling painting project.
Covering Floors and Furniture with Plastic Drop Cloths
When painting a ceiling with a sprayer, it is important to take measures to protect the floors and furniture in the work area. By covering them with plastic drop cloths, you can prevent paint from dripping or splattering onto these surfaces.
To cover floors and furniture with plastic drop cloths, follow these steps:
- Lay down plastic drop cloths over the entire floor area to create a protective barrier. Ensure that the cloths overlap each other to provide maximum coverage.
- Use painter’s tape to secure the edges of the drop cloths to the baseboards and prevent them from shifting during painting.
- Cover any furniture in the room by draping large sheets of plastic over them. Secure the edges of the plastic sheets with tape or bungee cords as needed.
- If possible, move any lightweight furniture out of the room to provide easier access for painting and minimize the risk of damage.
- Be thorough in your coverage, making sure all exposed surfaces are properly protected before starting to paint.
By taking these steps to cover floors and furniture with plastic drop cloths, you can effectively safeguard these areas from paint spills or splatters during ceiling painting.
Additionally, remember to remove any valuable or delicate items from the work area before starting to paint. This will further ensure their protection and prevent any accidental damage during the painting process.
Some Facts About How to Paint a Ceiling with a Sprayer:
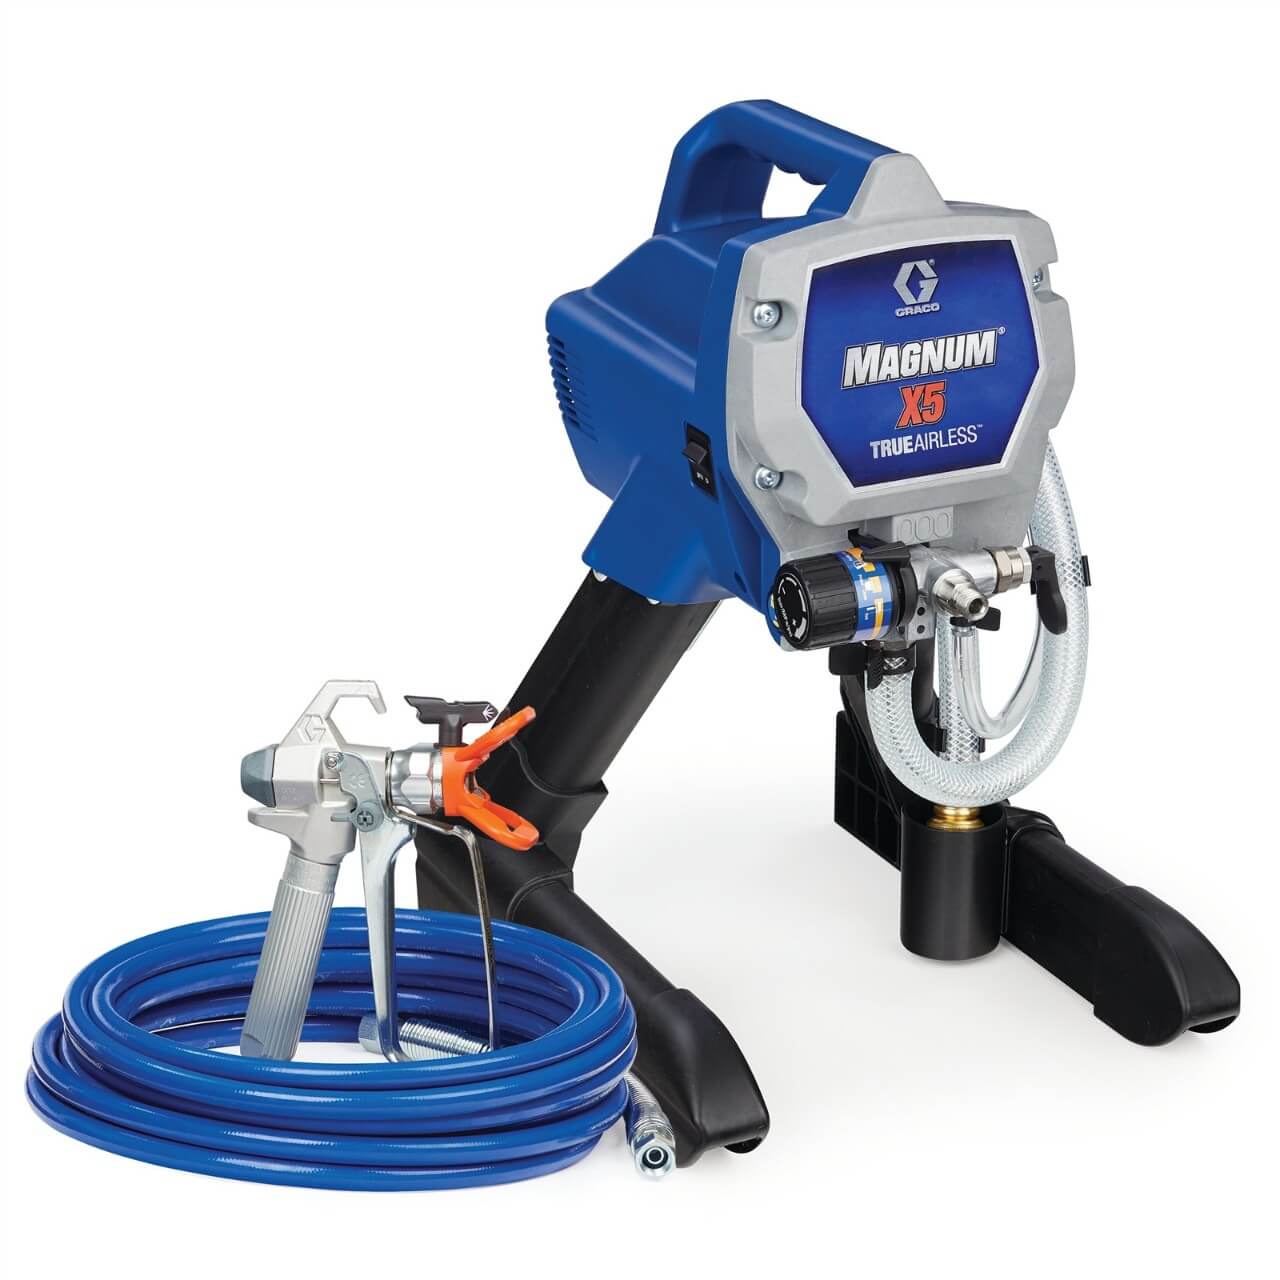
- ✅ Using an airless sprayer for spray painting the ceiling is a simple and efficient alternative to using rollers. (Source: Wagner Group)
- ✅ Painting a ceiling can be physically demanding, causing discomfort in the eyes, neck, and arms. (Source: Wagner Group)
- ✅ Airless sprayers make the job easier and quicker, reducing the effort required. (Source: Wagner Group)
- ✅ By using an airless sprayer, time, energy, and material can be saved, resulting in cost savings. (Source: Wagner Group)
- ✅ Safety precautions should be taken when operating spray equipment for painting ceilings, including using appropriate safety equipment. (Source: Graco)
Taping Plastic Sheets to the Walls
Taping plastic sheets to the walls is an important step in preparing the work area for painting the ceiling with a sprayer. It helps protect the walls from paint overspray and ensures clean lines between the ceiling and walls.
To tape plastic sheets to the walls, follow these steps:
- Measure and cut plastic sheets: Start by measuring the length of each wall that needs to be covered with plastic. Cut plastic sheets accordingly, ensuring they are long enough to reach from the floor to just below where the ceiling meets the wall.
- Attach plastic sheets to walls: Use painter’s tape to secure the top edge of each plastic sheet to the wall, ensuring it is straight and tightly stretched across. Place tape at regular intervals along the top edge, pressing firmly to ensure a strong hold. Repeat this process for each additional sheet, slightly overlapping them as needed.
- Seal edges with tape: To create a seal between the plastic sheet and wall, use painter’s tape along all edges of each sheet, pressing firmly to ensure a tight bond. This will prevent any paint or debris from getting behind the sheet during painting.
By following these steps, you can effectively tape plastic sheets to your walls before painting the ceiling with a sprayer, creating a clean and protected work area.
It is worth mentioning that when taping plastic sheets to the walls, make sure to handle them carefully and avoid creating any creases or folds that could impede their effectiveness. Additionally, it is important to regularly inspect the taped areas throughout the painting process, making any necessary adjustments or repairs as needed. By paying attention to these details, you can ensure that your work area remains properly protected throughout your painting project.
Removing Furniture for Easier Access
Furniture removal is an essential step in achieving easier access while painting a ceiling with a sprayer. By clearing the area of furniture, you create sufficient space to move around and reach all corners of the ceiling without hindrance. This ensures a smooth and efficient painting process.
To remove furniture for easier access:
- Start by assessing the size and weight of each piece of furniture. Identify any items that may be too heavy or bulky to move on your own.
- Clear the room by moving smaller and lighter furniture pieces first. Slide them away from the walls or out of the room entirely to create space for maneuverability.
- If certain furniture items cannot be moved due to their size or weight, cover them securely with plastic drop cloths. Ensure that these coverings are tightly secured with tape to protect against paint splatters or drips.
By following these steps, you can effectively remove furniture for easier access in preparation for painting the ceiling with a sprayer, allowing for a more streamlined painting process.
It is important to note that heavier or larger furniture pieces may require assistance from another person during removal. Collaborating with someone can help ensure the safe and efficient relocation of these items.
Ensuring Proper Ventilation
Proper ventilation is crucial when painting a ceiling with a sprayer, ensuring proper ventilation. It ensures that fumes from the paint are safely removed from the work area, allowing for a healthier and more comfortable environment to work in.
- Open windows and doors in the room to create a cross-ventilation effect.
- Use fans or air circulators to improve air circulation.
- If painting in an enclosed space, consider using exhaust fans or portable air purifiers to remove airborne contaminants.
- Avoid painting on days with high humidity as it can slow down the drying process and affect the overall quality of the paint job.
- Take breaks periodically to get fresh air outside of the work area.
- Follow any specific recommendations provided by the paint manufacturer regarding ventilation requirements ensuring proper ventilation for the specific type of paint being used.
It is important to note that ensuring proper ventilation adequate ventilation not only benefits your health but also helps with the drying process and overall paint adhesion.
In addition, ensuring proper ventilation reduces the risk of accidental inhalation of paint fumes, which may have harmful effects on your respiratory system. Ensuring proper ventilation also improves the overall efficiency of the painting process as it allows for better control over airflow and temperature.
Pro Tip: If possible, consider using a respirator mask while working in poorly ventilated areas or when working with particularly strong-smelling paints. This helps provide additional protection against harmful fumes.
Prepping the Ceiling

Prepping the ceiling is a crucial step before painting, ensuring a smooth and durable finish. In this section, we’ll discover two essential sub-sections that will help you achieve excellent results. First, we’ll explore the technique of sanding the ceiling for better paint adhesion, followed by washing the ceiling to remove dirt and dust. These effective prepping methods will set the foundation for a successful painting project, ensuring a professional-looking and long-lasting result.
Sanding the Ceiling for Better Paint Adhesion
Sanding the ceiling is an essential step in ensuring better paint adhesion.
To sand the ceiling for better paint adhesion, follow these steps:
- Prepare the work area by covering floors and furniture with plastic drop cloths.
- Tape plastic sheets to the walls to protect them from any overspray.
- Remove furniture from the room to create easier access to the ceiling.
- Ensure proper ventilation by opening windows or using fans.
Now, cover unique details that have not been covered already:
Properly sanding the ceiling helps to create a smooth surface for paint application. This step allows the paint to adhere better to the ceiling, ensuring a more even and long-lasting finish. By taking the time to sand the ceiling before painting, you can achieve professional-looking results that will enhance the overall aesthetic of your space.
Washing the Ceiling to Remove Dirt and Dust
Washing the ceiling is an essential step in preparing the work area before painting. By removing dirt and dust from the surface, it ensures a clean and smooth finish for the paint application.
To wash the ceiling and remove dirt and dust effectively, follow these four steps:
- Fill a bucket with warm water: Prepare a bucket of warm water that is neither too hot nor too cold. This temperature is ideal for effectively cleaning the ceiling without causing damage.
- Add mild detergent: Mix in a small amount of mild detergent into the warm water. Avoid using harsh chemicals or abrasive cleaners as they can potentially harm the ceiling material.
- Use a sponge or soft cloth: Dip a sponge or soft cloth into the soapy water mixture, ensuring it is damp but not dripping wet. Begin scrubbing the ceiling gently in circular motions, working your way across the entire surface.
- Rinse with clean water: After scrubbing, rinse out your sponge or cloth thoroughly with clean water, making sure no soap residue remains. Wring out any excess water before lightly wiping down the ceiling to remove any remaining dirt and detergent.
It’s important to note that while washing, do not oversaturate the ceiling as excessive moisture can cause damage to drywall or other ceiling materials.
By following these steps, you can effectively wash your ceiling to remove dirt and dust in preparation for painting, ensuring a pristine canvas for your project.
While washing the ceiling may seem like a straightforward task, there are just some details to keep in mind. For instance, always use gentle motions when scrubbing to avoid damaging the surface. Additionally, make sure to rinse off all soap residue thoroughly to prevent any potential issues during paint application.
By taking these extra precautions and paying attention to detail, you can ensure that your painted ceiling will have a professional-looking finish free from dirt and dust particles.
Setting up the Sprayer
Setting up the sprayer is a crucial step in achieving a flawless ceiling paint job. In this section, we’ll cover the necessary preparations for smooth spraying. From straining the paint to priming the sprayer and fine-tuning the settings, we’ll equip you with the essential know-how to ensure a successful painting experience. Get ready to transform your ceiling with the power of a spray gun!
Straining the Paint for Smooth Spraying
During the painting process, it is important to strain the paint for smooth spraying. By straining the paint, impurities such as clumps or dried debris can be filtered out, ensuring that only a consistent and even paint flow is delivered through the sprayer.
To strain the paint for smooth spraying, follow these 3 steps:
- Prepare a strainer or filter: Use a fine mesh strainer or filter specifically designed for paint. This will help remove any particles that may clog the sprayer nozzle and cause an uneven spray pattern.
- Pour the paint: Slowly pour the paint into a clean container or bucket that fits with the strainer or filter. This will allow for easy straining and ensure that no impurities are left behind.
- Strain the paint: Place the strainer or filter over a clean container and slowly pour the paint through it. Use a spatula or scraper to gently press on any remaining clumps to extract as much smooth paint as possible. This will help eliminate any debris that could potentially affect the quality of your sprayed finish.
In addition to these steps, it may also be helpful to stir the strained paint gently before transferring it to the sprayer, ensuring consistency throughout the entire painting process.
By following these steps and taking care to strain your paint before using a sprayer, you can ensure a smoother spraying experience with better results.
It is worth noting that proper ventilation should also be maintained during this process to avoid inhaling any fumes from solvents used in certain types of paints.
According to ‘Painting Techniques and Tips’ by Sherwin-Williams, straining the paint helps to remove dirt particles and other impurities that may affect surface quality when using a sprayer.
Get ready to prime that sprayer, because a well-prepped ceiling is about to have its paint dreams come true.
Priming the Sprayer
The process of priming the sprayer is an important step in preparing it for painting. By properly priming the sprayer, you ensure that the paint will flow smoothly and evenly, resulting in a high-quality finish.
To prime the sprayer, follow these four steps:
- Prepare the paint: Before priming the sprayer, strain the paint to remove any impurities or debris. This will help prevent clogs and ensure a smooth paint flow.
- Fill the sprayer: Next, fill the sprayer with properly strained paint. Be sure to use enough to cover the entire ceiling without running out midway through.
- Adjust settings: Once the sprayer is filled with paint, adjust its settings according to your desired spray pattern and volume. This may include adjusting the pressure, nozzle size, and fan width.
- Test spray: Before starting on the ceiling, perform a test spray on a scrap piece of cardboard or wood to ensure that everything is working correctly and that you are happy with the spray pattern.
By following these steps, you will effectively prime your sprayer for painting your ceiling.
In addition to these steps, it’s important to note that priming your sprayer will help improve its overall performance and reduce potential issues such as clogging or uneven spraying. Taking the time to properly prime your sprayer can save you time and frustration in achieving a smooth and professional-looking finish.
A pro tip for priming your sprayer is to clean it thoroughly after each use. This will help prevent any dried paint from clogging up your equipment and ensure optimal performance when you are ready to use it again.
Adjusting the Sprayer Settings for Painting
To ensure a smooth and even application of paint, it is crucial to adjust the sprayer settings properly before painting. This step is essential in achieving professional-looking results and minimizing potential issues during the painting process.
- Straining the Paint for Smooth Spraying: Before pouring the paint into the sprayer, it is recommended to strain it through a mesh strainer. This helps remove any impurities or debris that may clog the sprayer nozzle and affect the quality of the spray pattern.
- Priming the Sprayer: Priming the sprayer involves running clean water or solvent through it to flush out any residue from previous use. This step ensures that there are no leftover paint particles or contaminants in the sprayer, which could cause blockages or uneven spraying.
- Adjusting Spray Pattern: Depending on the desired coverage and type of surface being painted, adjusting the spray pattern is crucial. Most sprayers offer options such as horizontal, vertical, circular, and fan patterns. Choose an appropriate pattern and adjust it according to the size and shape of your ceiling surface.
- Regulating Paint Flow: The amount of paint flowing through the sprayer can be adjusted using a control knob or dial present on most models. Find a balance between too much paint causing drips and runs, and too little paint resulting in inadequate coverage.
- Controlling Air Pressure: Some sprayers allow for adjusting air pressure along with paint flow control. Higher air pressure can create finer atomization of paint particles, resulting in smoother finishes. Experiment with different air pressure settings to find what works best for your specific project.
It is worth noting that each sprayer model may have specific instructions regarding adjustments and settings, so it’s important to read the manual provided by the manufacturer. Additionally, regular maintenance of the sprayer, such as cleaning and lubricating, can help prolong its lifespan and ensure optimal performance.
Suggestions and their explanations:
- Practice with the Sprayer Before Starting: It is highly recommended to practice using the sprayer on a scrap piece of cardboard or a small section of the ceiling before tackling the entire area. This allows you to familiarize yourself with the sprayer settings, adjust them accordingly, and get a feel for the paint flow and coverage.
- Ensure Even Coverage and Avoid Drips: To achieve even coverage, maintain a consistent distance between the sprayer nozzle and the ceiling surface throughout the painting process. Keep your arm movement smooth and steady, overlapping each pass slightly to avoid streaks or missed spots. Pay attention to any drips that may occur and promptly address them by adjusting the paint flow or technique.
By following these suggestions, you can ensure that your sprayer settings are properly adjusted for painting your ceiling effectively while minimizing potential issues such as clogging, uneven coverage, or dripping. Taking the time to make these adjustments will lead to professional results that enhance the overall appearance of your space.
Painting the Ceiling
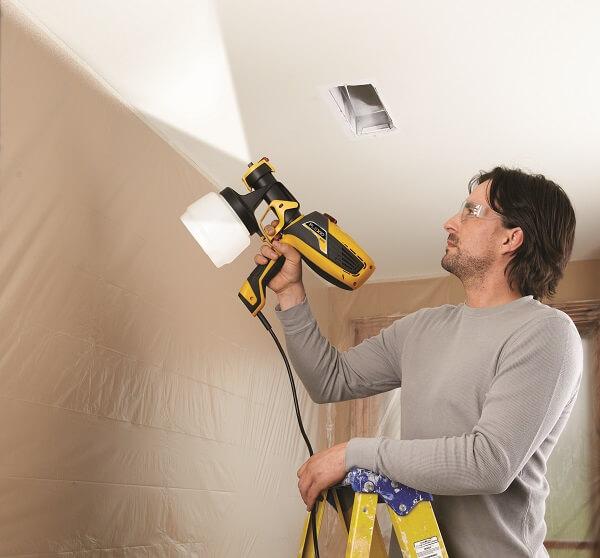
Achieving a flawless and professional-looking ceiling requires mastering the art of painting. In this section, we’ll dive into the essentials of painting the ceiling. From donning the right protective gear to employing precise strokes and overlapping techniques, we’ll explore the key steps necessary to ensure a smooth and even finish. Additionally, we’ll discuss the importance of applying a second coat when needed to achieve optimal coverage. Get ready to transform your ceiling with these expert tips!
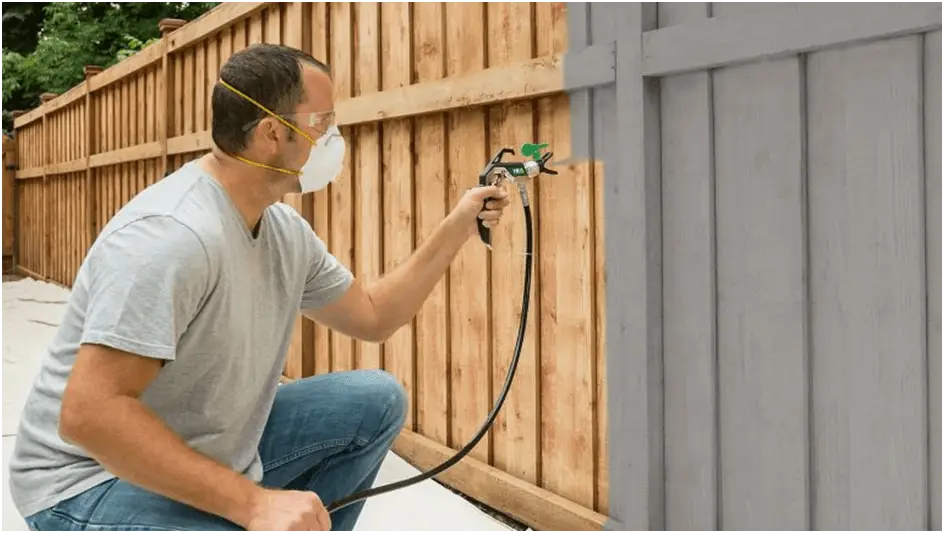
Wearing Protective Gear
Wearing protective gear is essential when painting a ceiling with a sprayer. It helps ensure safety and prevents any potential harm or injuries that may occur during the painting process.
- Safety goggles: Wearing safety goggles protects the eyes from paint overspray, dust, and other debris that may be present in the work area.
- Respirator mask: A respirator mask filters out paint fumes and airborne particles, providing respiratory protection for the painter.
- Disposable coveralls: Coveralls protect the clothing from getting stained or damaged by paint, ensuring easy cleanup after the job is done.
- Gloves: Wearing gloves not only keeps the hands clean but also provides protection from any harmful chemicals in the paint.
- Hat or cap: A hat or cap protects the head and hair from paint splatters and ensures a comfortable working environment.
- Shoe covers: Shoe covers are worn to prevent tracking paint onto other surfaces and to maintain cleanliness in the work area.
In addition to these gear items, it is important to choose clothing that covers exposed skin properly and wear closed-toe shoes for added safety. By wearing protective gear throughout the painting process, painters can minimize risks and focus on achieving professional results.
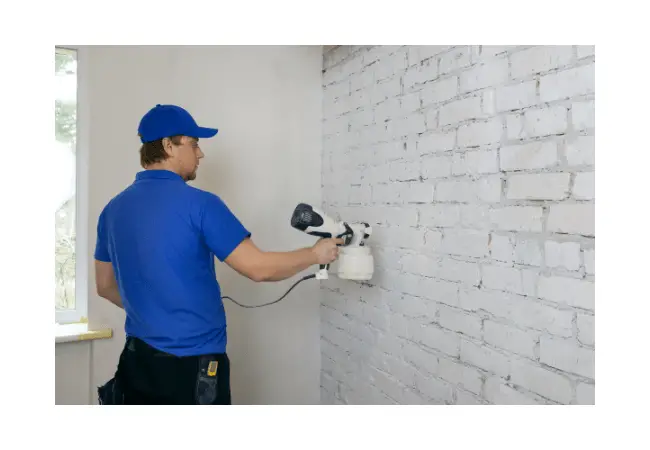
Using Long, Straight Strokes and Overlapping Each Pass
To achieve the technique of painting the ceiling with a sprayer using long, straight strokes and overlapping each pass, follow these steps:
- Begin by wearing protective gear such as goggles and a mask to protect yourself from paint particles or fumes.
- Hold the sprayer at a distance from the ceiling, typically around 12-18 inches.
- Start spraying with a long, continuous stroke across the length of the ceiling, moving in one direction.
- As you make each pass, overlap the previous stroke slightly to ensure complete coverage without leaving any gaps.
Using these long, straight strokes and overlapping each pass is a crucial technique when painting the ceiling with a sprayer. This method ensures even coverage and prevents streaks or uneven patches on the ceiling surface. It allows for a smooth and professional finish, enhancing the overall appearance of the room.
Additionally, it is recommended to practice this technique on a test surface or cardboard before starting to paint the actual ceiling. This allows you to familiarize yourself with the sprayer’s settings and get a feel for how much pressure is needed for optimal results.
Applying a Second Coat if Necessary
In order to achieve the desired result, it may be necessary to apply a second coat of paint to the ceiling. This can help ensure even coverage and a smooth finish.
- Strain the Paint: Before applying the second coat, it is important to strain the paint using a mesh strainer. This will help remove any impurities or clumps that may have formed in the paint.
- Allow Sufficient Drying Time: After applying the first coat, it is crucial to allow sufficient drying time before applying the second coat. This ensures that the first coat is fully dry and will not mix with fresh paint during application.
- Apply the Second Coat: When applying the second coat, use long, straight strokes and overlap each pass slightly. This helps in achieving consistent coverage and minimizing visible brush or roller marks.
It should be noted that not all ceilings may require a second coat of paint. Factors such as color intensity, previous color on the ceiling, and personal preference play a role in determining whether an additional coat is necessary.
To ensure a satisfactory outcome, careful consideration should be given before deciding whether or not to apply a second coat of paint. Taking these steps into account will help you achieve optimal results and leave your ceiling looking refreshed and vibrant.
Don’t miss out on achieving professional-looking results for your ceiling! Follow these steps carefully and consider applying a second coat if necessary. By taking this extra step, you can ensure even coverage and enhance the overall appearance of your painted ceiling.
Completion and Cleanup
When it comes to completing and cleaning up after painting a ceiling with a sprayer, there are two important steps to keep in mind. First, we’ll look at the process of removing drop cloths, which is essential for tidying up the workspace. Then, we’ll explore the steps involved in properly cleaning the sprayer, ensuring its longevity and optimal performance. These crucial tasks contribute to a successful and hassle-free painting project.
Removing Drop Cloths and Cleaning the Sprayer
Once the painting of the ceiling is complete, it is important to properly remove the drop cloths and clean the sprayer to ensure a neat finish.
To do this, follow these steps:
- Begin by carefully folding and removing the plastic drop cloths that were used to cover the floors and furniture. This will help prevent any paint or debris from being spread around the area.
- Next, take down the taped plastic sheets from the walls, making sure to avoid any damage or residue left behind. This will restore the walls to their original state.
- If any furniture was moved out of the way during painting, now is the time to put it back in its place.
- Additionally, make sure to open windows or use fans to ventilate the room properly and allow for faster drying of any remaining paint fumes.
These steps will help create a clean and organized workspace after painting the ceiling with a sprayer.
It’s worth noting that practicing with the sprayer before starting can be beneficial in achieving better results. It allows you to get comfortable with its settings and spray pattern, ultimately leading to smoother application.
Another aspect to keep in mind is ensuring even coverage and avoiding drips. By using long, straight strokes while overlapping each pass, you can achieve a more uniform and professional-looking finish on your ceiling.
Tips and Recommendations
Discover valuable tips and recommendations for painting your ceiling with a sprayer. Learn how to practice with the sprayer beforehand and ensure even coverage while avoiding unsightly drips. With these essential insights, you’ll achieve a flawless finish that will transform your space.
Practicing with the Sprayer Before Starting
Practicing with the sprayer before starting is an important step in ensuring a successful ceiling painting project. It allows you to familiarize yourself with the sprayer and its settings, helping you achieve a smooth and even application of paint.
To practice with the sprayer before starting, follow these five steps:
- Set up your work area: Prepare your work area by covering floors and furniture with plastic drop cloths, taping plastic sheets to the walls, and removing furniture for easier access. Ensure proper ventilation in the room.
- Strain the paint: Before priming the sprayer, strain the paint to remove any lumps or impurities. This helps ensure a smooth spraying process and prevents clogs in the sprayer nozzle.
- Prime the sprayer: Once the paint is strained, prime the sprayer according to the manufacturer’s instructions. This involves filling the reservoir with paint and running it through the sprayer until it flows smoothly.
- Adjust settings: Experiment with different spray patterns and air pressure settings on a scrap piece of material to find what works best for your specific project. This will help you determine which settings will give you optimal coverage and avoid unwanted drips or uneven application.
- Practice spraying technique: With proper protective gear on (such as goggles, gloves, and a mask), hold the sprayer at a consistent distance from the surface (usually 6-8 inches) and use long, straight strokes while overlapping each pass slightly. Practice maintaining an even speed and pressure for consistent coverage.
In addition to these steps, it is important to note that practicing with the sprayer before starting allows you to assess factors such as nozzle size, spray width control, and trigger responsiveness that may affect your spraying technique. By practicing beforehand, you can make any necessary adjustments or accommodations for a smoother painting process on your ceiling using a sprayer.
Ensuring Even Coverage and Avoiding Drips
To ensure an even coverage and prevent drips while painting a ceiling with a sprayer, there are specific steps that need to be followed. These steps include preparing the work area, setting up the sprayer, and using proper techniques during the painting process.
Here is a step-by-step guide to ensuring even coverage and avoiding drips while painting a ceiling with a sprayer:
- Preparing the work area: Before starting the painting process, it is important to cover the floors and furniture with plastic drop cloths to protect them from any paint splatters. Additionally, taping plastic sheets to the walls will help prevent any accidental overspray. Removing furniture from the room will also provide easier access to the ceiling for painting. Finally, ensuring proper ventilation in the room will help with drying time and prevent potential paint fumes.
- Setting up the sprayer: Straining the paint before filling up the sprayer will help remove any impurities that can cause clogs or uneven spraying. Priming the sprayer according to the manufacturer’s instructions is essential for smooth operation. Adjusting the sprayer settings based on the type of paint being used and desired results is crucial for achieving even coverage.
- Painting techniques: When painting with a sprayer, it is recommended to wear protective gear such as goggles, a respirator mask, and clothing that covers your skin. Using long, straight strokes while overlapping each pass ensures an even application of paint on the ceiling surface. It is essential to maintain a consistent distance from the ceiling throughout to avoid uneven spraying and drips.
- Applying a second coat if necessary: After completing one coat of paint, it is important to assess whether additional coats are needed for complete coverage and desired finish. If necessary, allow sufficient drying time before applying another coat following the same technique as before.
Conclusion
Painting a ceiling with a sprayer can be a convenient and efficient method. Using a sprayer allows for a smooth and even application, reducing the need for touch-ups. Moreover, it allows for faster coverage, saving time and effort. In addition to these benefits, using a sprayer can also help to minimize paint drips and splatters, resulting in a neater finish.
Overall, painting a ceiling with a sprayer is a practical and effective approach that can yield professional-looking results.
FAQs about How To Paint Ceiling With Sprayer
FAQs: How to Paint Ceiling with Sprayer
1. Can I use any type of interior emulsion paint with a paint sprayer?
No, it is important to use interior emulsion paint specifically designed for use with a paint sprayer. This type of paint is typically more fluid and has a consistency that allows for smooth and even spraying.
2. How can I compare different models of paint sprayers to choose the right one for my ceiling painting project?
To compare paint sprayer models, consider factors such as the sprayer’s power, spray pattern, capacity, ease of use, and cleaning features. Read customer reviews and consult with experts or manufacturers for guidance in selecting the best sprayer for your specific needs.
3. What is the role of dish soap in painting a ceiling with a sprayer?
Dish soap is used to wash the ceiling before painting. It helps remove dust and dirt that could affect the paint’s adherence. Mix warm water with a small amount of dish soap, gently wash the ceiling surface, and then rinse it thoroughly before starting the painting process.
4. How can I prevent neck discomfort when using a paint sprayer to paint a ceiling?
To prevent neck discomfort, consider using an extension tip that can attach to the paint sprayer. This allows you to reach high ceilings without straining your neck. Additionally, take regular breaks, stretch, and adjust your body position as needed during the painting process.
5. What safety kit should I use when painting a ceiling with a sprayer?
When using a sprayer, it is important to wear a safety kit that includes dust masks or filters to protect against inhaling paint fumes and debris. Safety glasses or goggles should be worn to protect the eyes from paint droplets. Additionally, wear coveralls or old clothes and shoe covers to avoid getting paint on your clothes and shoes.
6. What are the benefits of using a Wagner sprayer for painting a ceiling?
Using a Wagner sprayer for painting a ceiling offers several benefits. It makes the job easier and quicker, reducing the physical effort required. The sprayer provides a wider spray pattern, which ensures uniform coverage and a better finish compared to using brushes or rollers. It also saves time, energy, and material, resulting in cost savings for the painting project.
Leave a Reply