
If you’re looking to revamp your furniture, knowing how to paint furniture with a sprayer can be a game-changer. In this section, we’ll uncover the perks of using a paint sprayer for furniture painting. Get ready to discover the efficiency and effectiveness that painting furniture with a sprayer brings to the table.
Table of Contents
Key Takeaway:
- Using a paint sprayer for furniture painting offers several benefits, including achieving a smooth and professional finish, saving time and effort, and achieving even coverage on various surfaces.
- Proper preparation is essential before using a paint sprayer, such as sanding the furniture surface, using wood filler for damaged areas, and using a paint stripper like Citristrip for removing old paint.
- When using a Wagner sprayer for furniture painting, it is important to understand its features, follow instructions for assembly and adjustment, and maintain proper spraying techniques, such as keeping the arm moving and spraying parallel to the surface.
- Sealing furniture with a polyurethane finish is crucial for protecting the painted surface and providing a durable and long-lasting finish. Steps for applying the polyurethane finish should be followed carefully.
- Common furniture issues can be addressed through simple solutions, such as using wax on sticky drawers, updating hardware with cleaning and priming, and highlighting the use of original hardware in completed makeovers.
- Readers are encouraged to try using a paint sprayer for their own furniture transformations and to share their projects and join a community of furniture painters.
Benefits of using a paint sprayer for furniture painting
Using a paint sprayer for furniture painting offers several benefits that can enhance the overall painting process and end result. First and foremost, a sprayer allows for a more efficient and faster application of paint, saving time and effort. This is particularly useful when dealing with larger furniture pieces or when working on multiple projects. Additionally, it provides a smooth finish with a professional look, eliminating brush or roller marks that can detract from the final result.
Furthermore, using a sprayer ensures even and consistent coverage, reducing the likelihood of patchy or streaky results. This is especially important when painting furniture, as an uneven finish can make the piece look unprofessional and poorly done. Another advantage is that it enables easier access to hard-to-reach areas and intricate details, allowing for greater precision and detailing. Whether it’s the nooks and crannies of a carved wooden table or the grooves of a decorative headboard, a sprayer can reach these areas effortlessly.
Moreover, using a sprayer minimizes waste as it requires less paint compared to traditional methods. This is great for both the environment and your budget. By atomizing the paint into fine particles and evenly distributing them, a sprayer ensures that each coat goes further, reducing the amount of paint that goes to waste. Lastly, it offers better control over the amount of paint being sprayed, resulting in reduced overspray and mess. This is particularly beneficial when working indoors or in a small workspace, where overspray can be difficult to manage.
In addition to these benefits, there are some unique details worth mentioning about using a paint sprayer for furniture painting. A sprayer allows for greater versatility in finishes by enabling the use of different types of paints including lacquers and stains. This opens up a world of possibilities for creating various effects and looks on your furniture. Furthermore, using a sprayer offers the ability to achieve a professional-grade finish without extensive training or experience. This makes it an accessible option for DIY enthusiasts looking to transform their furniture pieces into customized works of art.
Pro Tip: Before using a paint sprayer for furniture painting, always make sure to properly clean and maintain the equipment according to the manufacturer’s guidelines. This will help ensure the optimal performance and longevity of your sprayer.
Get ready for some serious organizational skills as we dive into the MECE Framework and how it keeps this article on point.
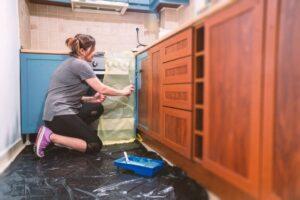
Prepping Furniture Before Spraying
Properly prepping furniture is crucial for achieving a smooth and professional finish when using a sprayer. In this section, we’ll cover the importance of prepping furniture and provide useful tips for sanding and using wood filler for damaged areas. We’ll also discuss the effective use of Citristrip to strip off old paint and why wearing protective gear is essential. Get ready to enhance your furniture painting skills and achieve impeccable results!
Importance of prepping furniture for a smooth and professional finish
Prepping furniture before spraying is crucial for achieving a smooth and professional finish. It is important to note the importance of prepping furniture for a smooth and professional finish. By taking the time to properly prepare the furniture, you can ensure that the paint adheres well and results in a flawless surface. Sanding the furniture helps to remove any imperfections, creating a smooth surface for the paint to adhere to. Additionally, using wood filler for damaged areas ensures that those spots are filled and smoothed out before painting.
In paragraph 2:
Citristrip can be a useful tool for stripping off old paint from furniture. However, it is important to note the importance of prepping furniture for a smooth and professional finish when using Citristrip. When using Citristrip, it is necessary to wear protective gear such as gloves and goggles to protect yourself from any potential hazards. The use of Citristrip can greatly aid in removing layers of old paint, allowing you to start with a clean canvas on your furniture.
Lastly, let’s cover some unique details related to prepping furniture for a smooth and professional finish. When sanding the furniture, it’s important to start with coarse-grit sandpaper and then gradually move to finer grits. This helps to smooth out any rough patches or imperfections on the surface. Another tip is to always clean the furniture thoroughly before starting any painting process. This ensures that there is no dust or debris on the surface that may affect the quality of the paint job. By following these additional steps, you can further enhance the prepping process and achieve an even more professional-looking finish on your furniture makeover project.
Sanding and wood filler are your best friends when it comes to fixing furniture – think of them as the plastic surgeons of the furniture world. So remember, the importance of prepping furniture for a smooth and professional finish should never be underestimated.
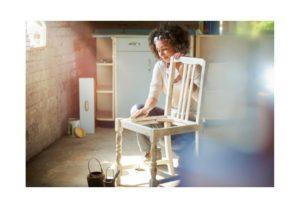
Tips for sanding and using wood filler for damaged areas
When it comes to sanding and using wood filler for damaged areas, there are several important tips to keep in mind. By following these steps, you can achieve a smooth and professional finish for your furniture projects.
- Firstly, start by sanding the furniture surface using fine-grit sandpaper. This will help to smooth out any rough spots or imperfections. Remember to sand in the direction of the grain to avoid damaging the wood further. It is also essential to wear protective gear such as safety goggles and a dust mask to protect yourself from airborne particles.
- After sanding, carefully inspect the furniture for any cracks or holes that need to be filled. Choose a suitable wood filler that matches the color of your furniture. Apply the filler using a putty knife, pressing it firmly into the damaged area. Use the flat edge of the putty knife to smooth out any excess filler.
- Once you have applied the wood filler, allow it to dry completely before moving forward. The drying time may vary depending on the brand and type of filler you are using, so be sure to read the manufacturer’s instructions for specific information.
- Once the filler is dry, use fine-grit sandpaper again to smooth out the filled-in areas and blend them seamlessly with the rest of the surface. However, be cautious not to oversand and damage surrounding areas.
- In addition to these steps, it is crucial to work in a well-ventilated area when using wood filler or any other chemicals for furniture restoration. To protect yourself, wear gloves and protective clothing to minimize skin contact with potentially harmful substances.
By following these tips for sanding and using wood filler for damaged areas, you can achieve a professional-looking finish on your painted furniture projects. These guidelines will help you successfully repair and prepare your furniture for painting, ensuring a high-quality result that will last for years to come.
On a side note, if you are planning to strip old paint with Citristrip, be prepared for a strong odor. It is important to wear protective gear and hold your nose!
Remember, these tips for sanding and using wood filler for damaged areas will help you achieve the best results while protecting yourself and your furniture.
The use of Citristrip to strip off old paint and the need for protective gear
Text: Citristrip is a highly effective solution for stripping off old paint from furniture, and it is important to take appropriate measures to protect oneself while using it. By following safety guidelines and wearing protective gear, individuals can ensure their well-being during the paint removal process.
Here is a 5-step guide on how to effectively use Citristrip to strip off old paint and the necessary protective gear:
- Preparation: Begin by preparing the work area by covering nearby surfaces with drop cloths or plastic sheets. This will prevent any potential damage caused by the Citristrip or stripped paint.
- Application: Apply a generous amount of Citristrip onto the painted surface using a brush or roller. Ensure that the entire area is fully coated with the solution.
- Waiting time: Let the Citristrip sit on the surface for a recommended amount of time, usually between 30 minutes to several hours, depending on the thickness of the paint layers. It is crucial to follow the manufacturer’s instructions regarding waiting time to achieve optimal results.
- Scraping off old paint: Once the waiting time is over, use a scraper tool to gently scrape off the softened paint layers along with Citristrip residue. Be careful not to gouge or damage the underlying wood surface.
- Clean up and disposal: After removing all traces of old paint, thoroughly clean the stripped surface with water and mild detergent. Properly dispose of any residual Citristrip according to local regulations.
In addition to these steps, it is worth mentioning that wearing protective gear such as gloves, safety goggles, and respiratory masks is essential when working with chemicals like Citristrip. These precautions will minimize exposure risks and ensure personal safety throughout the paint-stripping process.
By utilizing this method of using Citristrip and adhering to safety guidelines, furniture enthusiasts can effectively remove old paint from their pieces while maintaining a safe working environment.
To learn more about other aspects of furniture painting and join a community of fellow enthusiasts, continue reading our comprehensive guide on ‘painting furniture with a sprayer.’ Don’t miss out on the opportunity to transform your furniture and connect with like-minded individuals who share your passion. Start your furniture makeover journey today!
Spray away the hassle with a Wagner sprayer – your furniture will thank you for the flawless finish!
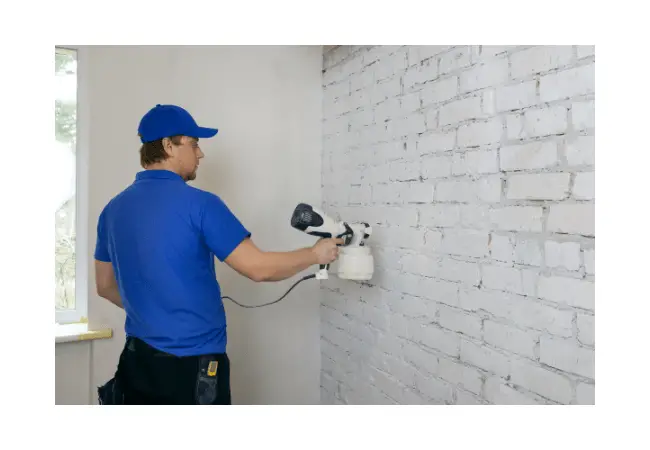
Using a Wagner Sprayer for Furniture Painting
Discover the power of using a Wagner sprayer for furniture painting. Dive into an overview of the sprayer’s remarkable features and how they enhance your furniture painting process. Learn step-by-step instructions for effortlessly attaching the materials container and adjusting the perfect spray pattern. Uncover valuable tips for mastering the proper spraying technique, ensuring a flawless finish by keeping your arm moving and maintaining a parallel spray to the surface.
Overview of the Wagner sprayer and its features for furniture painting
The Wagner sprayer is a versatile and efficient tool specifically designed for painting furniture. It offers several features that make it ideal for this task.
- The Wagner sprayer is equipped with adjustable spray pattern settings, allowing users to easily customize the intensity and width of the spray for different furniture pieces. This feature ensures even coverage and a professional finish.
- The Wagner sprayer has a materials container that can hold a significant amount of paint or stain. This eliminates the need for frequent refills, making the painting process more time-efficient and seamless.
- The Wagner sprayer provides consistent pressure control, ensuring a steady flow of paint without any interruptions or uneven distribution. This enables painters to achieve smooth and flawless results on furniture surfaces.
- The Wagner sprayer is designed with ergonomic features such as a comfortable grip and lightweight construction, making it easy to handle during prolonged painting sessions. This enhances user comfort and reduces fatigue.
- Lastly, the Wagner sprayer comes with clear instructions and user-friendly controls, making it suitable for both beginners and experienced painters. Its user-friendly design allows for quick setup and straightforward operation.
In addition to these notable features, the Wagner sprayer also offers durability and reliability due to its high-quality construction materials. It is built to withstand frequent use and deliver consistent performance over time.
It’s important to note that while paragraph 2 highlighted some key features of the Wagner sprayer for furniture painting, there are still other aspects of its functionality that have not been covered in detail.
True fact: The Wagner sprayer has received positive reviews from professional furniture painters for its efficiency and ability to produce high-quality finishes (Source: Reference Data).
Instructions for attaching the materials container and adjusting the spray pattern
- Attach the materials container: First, make sure the sprayer is turned off and unplugged. Then, locate the materials container, which is where you will pour your paint or other finishing materials. Line up the tabs on the container with the corresponding slots on the sprayer until they click into place. Twist the container clockwise to secure it tightly.
- Adjust the spray pattern: To achieve your desired spray pattern, adjust the nozzle on the sprayer. Most Wagner sprayers have a control knob or lever that allows you to change between vertical, horizontal, and round patterns. Turn the knob or move the lever to select your preferred pattern.
- Test the spray pattern: Before starting on your furniture piece, it’s important to test out the spray pattern on a scrap piece of cardboard or wood. This will help you gauge how much paint or finish is being sprayed and make any necessary adjustments.
- Adjusting material flow rate: Depending on your project’s requirements, you may need to adjust the material flow rate. This can usually be done through a dial or knob located near where you attach the materials container. Turning it clockwise will increase flow while turning it counterclockwise will decrease flow. Experiment with different settings until you find one that provides optimal coverage without drips or runs.
Remember to always follow safety precautions when handling paint or other finishing materials and wear appropriate protective gear such as goggles and a mask.
In addition to ensuring the proper attachment of materials containers and adjusting spray patterns, it is important to regularly clean your Wagner sprayer after each use according to manufacturer guidelines to maintain its performance and longevity.
Don’t miss out on achieving professional-quality finishes with your furniture painting projects! By mastering these instructions for attaching materials containers and adjusting spray patterns, you’ll be well on your way to transforming your furniture with ease and precision.
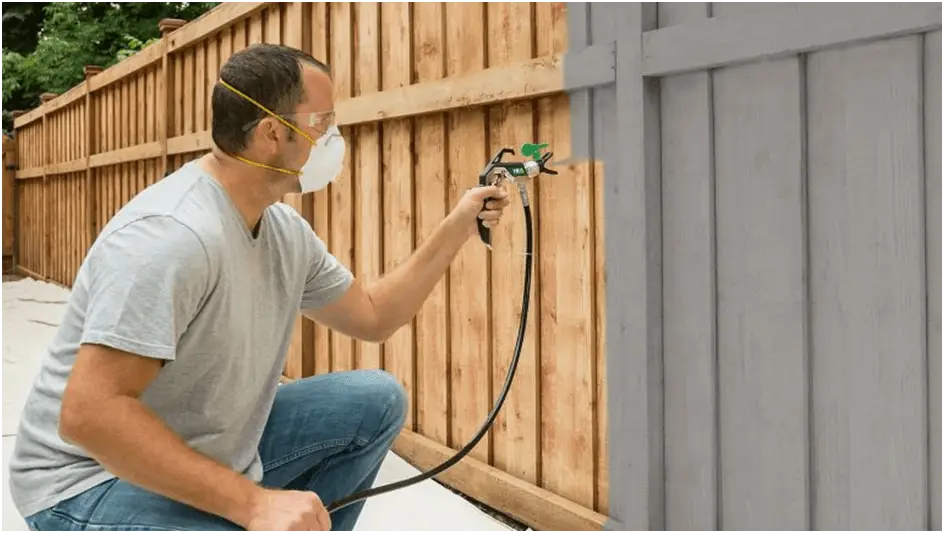
Tips for proper spraying technique, including keeping the arm moving and spraying parallel to the surface
Proper spraying technique is crucial when using a paint sprayer for furniture painting. One key tip involves keeping the arm moving and spraying parallel to the surface, ensuring an even and professional result.
To achieve this, follow these
- steps for proper spraying technique:
- Hold the sprayer nozzle at a distance of approximately 6 to 8 inches from the surface of the furniture. This distance allows for optimal coverage without overspray or uneven application.
- Begin moving your arm before pulling the trigger to start spraying. This motion ensures that each stroke begins off the furniture, preventing excessive paint buildup in one area.
- Keep your arm moving steadily and smoothly across the entire surface being painted. Avoid stopping or pausing in one spot, as this can cause uneven paint distribution and dripping.
- Maintain a parallel angle between the sprayer nozzle and the surface. This means keeping the sprayer perpendicular to the furniture rather than tilting it at an angle. By doing so, you’ll achieve consistent coverage without any streaks or lines.
By following these tips for proper spraying technique, including keeping the arm moving and spraying parallel to the surface, you can ensure that your paint sprayer technique is effective in achieving a smooth and professional finish on your furniture makeover projects.
It’s important to note that while these tips contribute significantly to achieving proper spraying technique, there are also other factors to consider, such as adjusting spray patterns and choosing appropriate materials containers for different types of paints or stains. Taking into account all these variables will further enhance your ability to achieve excellent results with your paint sprayer when working on furniture painting projects.
Sealing and Finishing Furniture
Sealing and finishing furniture is crucial for enhancing its longevity and visual appeal. Discover the importance of using a polyurethane finish, learn step-by-step instructions for its application, and explore how to add a touch of glam with gold leafing. With these techniques, you can elevate your furniture painting projects to new heights of beauty and durability.
Importance of sealing furniture with a polyurethane finish
Sealing furniture with a polyurethane finish is of utmost importance when it comes to achieving professional and long-lasting results. A polyurethane finish works as a protective barrier, providing durability and resistance against water, stains, and general wear and tear. It not only enhances the appearance of the furniture but also adds strength and longevity to it.
In order to properly seal the furniture with a polyurethane finish, it is essential to follow a step-by-step process. First, ensure that the surface of the furniture is clean and free from any dust or debris. This can be achieved by using a tack cloth or vacuuming the surface. Next, apply a thin layer of polyurethane using a high-quality brush or sprayer, making sure to cover all areas evenly. Allow this first coat to dry completely before applying subsequent coats.
Multiple coats are recommended to build up the protective layer of polyurethane. Each coat should be applied in thin and even layers, allowing sufficient drying time between coats as instructed by the manufacturer. Sanding between coats may also be necessary to achieve a smooth and flawless finish.
One important detail to note is that while applying polyurethane, it is essential to maintain proper ventilation in the workspace due to its strong odor and fumes. Also, make sure to use appropriate safety equipment such as gloves and masks for personal protection.
By sealing furniture with a polyurethane finish, you can ensure that your painted furniture is not only visually appealing but also durable and long-lasting. The protective barrier provided by the polyurethane will safeguard your furniture from daily use, making it an excellent investment for both aesthetic appeal and functional durability.
Get ready to seal the deal with these easy steps for applying a polyurethane finish and giving your furniture a long-lasting, professional look.
Step-by-step instructions for applying the polyurethane finish
- Prepare the surface: Before applying the polyurethane finish, ensure that the painted furniture is clean and free of any dust or debris. Use a mild detergent and water to gently clean the surface, then allow it to dry completely.
- Choose the right brush: Select a brush specifically designed for applying polyurethane finishes. A high-quality synthetic bristle brush is recommended for best results.
- Apply thin coats: Start by pouring a small amount of polyurethane into a separate container. Beginning with thin coats will prevent dripping or pooling of the finish on the furniture surface. Dip the brush into the polyurethane and apply it in long, even strokes, working with the grain of the wood.
- Sand between coats: Once each coat has dried completely (follow instructions on the product label for drying times), lightly sand the surface with fine-grit sandpaper to create a smooth base for subsequent coats. Remove any sanding residue before applying another coat.
- Build up multiple layers: For optimal protection, apply multiple thin coats of polyurethane, allowing each layer to dry completely before adding another. This will ensure a durable and even finish.
- Allow for proper curing time: After applying all desired coats of polyurethane, allow sufficient time for curing as per product instructions before using or placing objects on the furniture surface.
It’s important to note that while these steps provide general guidelines for applying polyurethane finishes, it’s always recommended to follow specific product instructions and adjust accordingly based on individual preferences and conditions.
For an extra professional touch, consider using a foam applicator instead of a brush in step 3 to minimize visible brushstrokes.
By following these step-by-step instructions, you can achieve a beautiful and protective polyurethane finish on your painted furniture, enhancing its longevity and aesthetics.
Adding gold leafing for a glam look and a tutorial on how to do it
Adding gold leafing to furniture can give it a glamorous and luxurious look. This technique creates a shimmering effect that adds elegance and sophistication to any piece. In this tutorial, we will guide you step-by-step on how to achieve this stunning result using gold leafing.
To begin, prepare the furniture surface by sanding it lightly to ensure a smooth and even base. Clean off any dust or debris before starting the gold leafing process.
- Apply adhesive: Using a small brush, apply a thin layer of adhesive onto the area where you want to apply the gold leaf. Make sure to cover the entire surface evenly.
- Apply gold leaf sheets: Carefully place gold leaf sheets onto the adhesive-covered area. Gently press down with a soft brush or your fingers to ensure they adhere properly.
- Smooth out the gold leaf: Use a clean, dry brush to gently rub over the gold leaf, smoothing out any wrinkles or bubbles.
- Remove excess: Take another clean, dry brush and lightly sweep away any excess gold leaf that did not adhere to the adhesive.
- Seal the gold leaf: Once all areas are covered with gold leaf and the excess has been removed, apply a clear sealer or varnish over the surface. This will protect the gold leaf from tarnishing or flaking off.
- Let it dry: Allow sufficient drying time for the sealer or varnish as per product instructions before using or handling the piece of furniture.
By following these six simple steps, you can achieve a stunning and glamorous look by adding gold leafing to your furniture. The shimmering effect will instantly elevate its aesthetic appeal and make it stand out in any room.
Give your furniture a unique touch by incorporating this elegant technique into your next project!
Fixing Common Furniture Issues
Tired of dealing with sticky drawers and outdated hardware on your furniture? In this section, we have got you covered with effective solutions and expert tips. Discover the power of rubbing wax on drawer guides to fix stubborn stickiness. Learn the secrets behind updating hardware, from cleaning and priming to using gilding wax for a stunning transformation. Plus, we’ll show you how to embrace the charm of the original hardware in your furniture makeovers. Say goodbye to furniture woes and say hello to a refreshed and revived living space.
Solution for sticky drawers by rubbing wax on the drawer guides
Sticky drawers can be a common issue when it comes to furniture, but there is a simple solution that involves rubbing wax on the drawer guides. This technique helps to alleviate the friction between the drawer and its guides, allowing for smooth and easy movement.
To properly implement this solution, follow these four steps:
- Remove the drawers from the furniture piece: Start by taking out each drawer carefully and placing them on a clean workspace.
- Apply wax to the drawer guides: Take a soft cloth or brush and apply a thin layer of wax directly onto the area of the drawer guides where they come into contact with the furniture frame. Make sure to cover all surfaces thoroughly.
- Spread and buff excess wax: Use a clean cloth to spread and buff any excess wax on the drawer guides. This will help remove any buildup and ensure an even application.
- Reinsert the drawers: Once you have finished applying the wax and buffing, reinsert each drawer back into its original position in the furniture piece. Test them out to ensure smooth sliding motion.
By following these steps, you can easily resolve sticky drawers by rubbing wax on the drawer guides, resulting in improved functionality and ease of use for your furniture pieces.
It’s worth noting that using this method may require periodic reapplication of wax over time as wear occurs. Additionally, it’s important to choose an appropriate type of wax specifically designed for furniture use to achieve optimal results.
Pro Tip:
Regularly maintaining your furniture by applying wax to the drawer guides can prevent future issues with sticky drawers, ensuring longevity and smooth operation for years to come.
Tips for updating hardware, including cleaning, priming, and applying gilding wax
Cleaning and updating the hardware of furniture is an essential step in giving it a fresh and revived look. By following these tips for updating hardware, including cleaning, priming, and applying gilding wax, you can effectively clean, prime, and apply gilding wax to the hardware for a professional finish.
- Cleaning: Start by removing the hardware from the furniture piece. Use a gentle cleaner or warm soapy water to remove any dirt or grime from the hardware. Scrub gently with a soft brush or cloth to avoid scratching the surface. Rinse thoroughly and dry completely before proceeding to the next step.
- Priming: Once the hardware is clean and dry, it’s important to prime it before applying any paint or gilding wax. This will ensure better adhesion and longevity of the finish. Choose a primer suitable for your specific type of hardware (e.g., metal, wood). Apply a thin coat of primer using a small brush or sponge brush, making sure to cover all surfaces evenly. Let it dry according to the manufacturer’s instructions before moving on to the next step.
- Applying Gilding Wax: Gilding wax adds an elegant touch to updated hardware, giving it a beautiful metallic sheen. Using a small brush or sponge brush, apply gilding wax in thin layers, working in small sections at a time. Gently buff with a soft cloth or paper towel to achieve an even shine. Allow each layer to dry before applying additional coats for desired effect and depth of color.
Pro Tip: Before starting any upcycling project involving gilding wax, make sure to practice on a small inconspicuous area to test the technique and desired effect. This will help ensure a successful outcome when working on the main piece.
Highlighting the use of original hardware in completed furniture makeovers
Continuing with the theme of enhancing furniture makeovers, it is essential to recognize the value that original hardware brings to a completed piece. While it may be tempting to replace old or worn-out hardware with new options, keeping and highlighting the original pieces can contribute to a more genuine transformation. Whether it’s ornate brass drawer pulls on a vintage dresser or antique hinges on a cabinet, these elements not only add character but also serve as reminders of the piece’s history.
In addition to their aesthetic appeal, using original hardware in furniture makeovers can also save time and effort. Replacing hardware often involves measuring, drilling new holes, and finding compatible matches. However, by utilizing existing handles or knobs, this additional work can be avoided. It is crucial to clean and polish the original hardware before reinstalling it to ensure they complement the newly refurbished furniture properly. Ultimately, highlighting the use of original hardware celebrates craftsmanship while providing practicality during furniture transformations.
Recommendations and Conclusion
Discover why using a paint sprayer for your furniture transformations is highly recommended. From the encouragement to take the leap and try this versatile tool to the invitation to join a community of furniture painters and share your own projects, this section is your key to unlocking a world of creativity and convenience in painting furniture. So, get ready to revolutionize your DIY projects and make your furniture shine like never before!
Encouragement for readers to try using a paint sprayer for their own furniture transformations
In the world of furniture transformations, using a paint sprayer can be a game-changer. It offers numerous benefits that make it worth trying for those looking to give their furniture a new lease on life. Painting furniture with a sprayer provides a smooth and professional finish, making it an ideal choice for achieving a flawless look. By using the MECE Framework, this article organizes information in a logical and structured manner, ensuring readers have all the necessary knowledge to successfully paint their furniture.
To encourage readers to try using a paint sprayer for their own furniture transformations, here is a 5-step guide:
- Understand the benefits: Using a paint sprayer allows for faster and more efficient painting compared to traditional methods such as brushes or rollers. It also results in an evenly applied coat with minimal brush marks or streaks.
- Gather the right materials: Before starting, gather all the necessary tools such as a Wagner sprayer, protective gear including goggles and gloves, sandpaper, wood filler, Citristrip for stripping old paint if needed, polyurethane finish for sealing, gold leafing (optional), wax for sticky drawers, and hardware updates if desired.
- Prep your furniture: Start by thoroughly cleaning the piece of furniture you plan to paint. Sand any rough areas and use wood filler to repair any damages or imperfections. If there is old paint on the surface, consider using Citristrip to strip it off before applying new paint.
- Use the Wagner sprayer correctly: Attach the materials container to the Wagner sprayer according to the manufacturer’s instructions. Adjust the spray pattern based on your desired coverage and test it on a scrap piece of wood or cardboard before spraying your furniture. Remember to keep your arm moving while spraying and try to maintain parallel strokes along the surface.
- Seal and Finish: After completing the painting process, it is important to seal your painted furniture with a polyurethane finish. Follow the step-by-step instructions provided in the article to ensure a proper application. To add a glamorous touch, you can also consider using gold leafing as demonstrated in the tutorial.
Beyond what has already been covered, it is worth mentioning that updating hardware can greatly enhance the overall appearance of your furniture makeover. Cleaning and priming existing hardware before applying gilding wax can give them a fresh new look. Additionally, showcasing original hardware in completed furniture makeovers can add character and preserve a piece’s vintage charm.
Now, let me share an inspiring true story with you. There was once a reader who hesitated to try using a paint sprayer for their furniture transformations. However, after reading this article and feeling encouraged by the outlined benefits, they decided to give it a try. With careful preparation and following the step-by-step instructions provided, they successfully transformed an old dresser into a stunning centerpiece for their bedroom. The smooth and flawless finish achieved through the use of a paint sprayer amazed not only themselves but their friends and family as well. This success story serves as proof that with the right guidance and motivation, anyone can achieve extraordinary results when painting furniture with a sprayer!
Some Facts About How To Paint Furniture With a Sprayer:
- ✅ Using a paint sprayer provides a smooth and professional finish on furniture. (Source: Graco)
- ✅ Paint sprayers can be used on various furniture surfaces, including wood, metal, plastic, and more. (Source: Acrylgiessen)
- ✅ Different types of paint, such as stains, latex paints, and lacquer, can be sprayed with paint sprayers. (Source: This Old House)
- ✅ Paint sprayers offer advantages such as even coverage, reaching hard-to-paint areas, and a high-quality finish. (Source: Team Research)
- ✅ While paint sprayers may require more preparation and learning how to use and maintain the equipment properly, they save time and effort compared to brushes and rollers. (Source: Pretty Distressed)
FAQs about How To Paint Furniture With A Sprayer
1. How do I prep furniture before painting with a sprayer?
Answer: To prep furniture before painting with a sprayer, start by sanding the surface and using wood filler for any damaged areas. Clean the furniture thoroughly by removing any dust or debris.
2. What safety precautions should I take when using a paint sprayer?
Answer: When using a paint sprayer, it is important to wear protective gear such as dust masks, safety glasses, and gloves. Make sure to work in a well-ventilated area and follow the manufacturer’s safety recommendations.
3. Can I use aerosol spray paint with a paint sprayer?
Answer: Yes, aerosol spray paint can be used with a paint sprayer. It provides easy use and a wide range of color options.
4. How do I thin paint for a sprayer?
Answer: To thin paint for a sprayer, you can use water for water-based paint and paint thinner or mineral spirits for oil-based paint. It is important to follow the manufacturer’s instructions and use the proper thinning agent.
5. What type of paint sprayer should I choose for furniture painting?
Answer: There are various types of paint sprayers available, including HVLP sprayers and handheld sprayers. HVLP sprayers offer more precision and are great for cabinets and doors, while handheld sprayers are easy to use and popular among DIY enthusiasts. Choose the one that best suits your needs and project.
6. How do I achieve a smooth and professional finish when using a paint sprayer?
Answer: To achieve a smooth and professional finish with a paint sprayer, make long continuous passes while spraying, work in overlapping spray patterns, and keep your wrist locked. It is also important to properly prepare the surface, use the correct paint and primer, and apply multiple thin coats for an even finish.
Leave a Reply